Using Jenkins and Anka Build Cloud
The Jenkins Anka Plugin provides a quick way to integrate Anka Build Cloud with Jenkins. The plugin helps Jenkins jobs dynamically provision Anka VM instances (based on the label used) for building, testing, and more.
- Support for both Pipeline and Freestyle Jenkins jobs.
- Supports both Static Slave Templates (under Configure Clouds) and Dynamic Labelling (in your repo's Jenkinsfile).
- The VMs become deleted after every job finishes.
- Supports automated VM Tag creation after your jobs run. This Cache Builder feature helps optimize subsequent builds as the dependencies are already on the VM.
- Supports both JNLP and SSH based connections to Anka VMs.
In order to follow these instructions, you will need to install the Anka CLI and an understanding of how to start the VM and launch the viewer.
VM Template & Tag Requirements
The Jenkins Anka Plugin requires a VM with Java, SSH Remote Login, and port forwarding:
- In the VM, install the proper OpenJDK version.
- Within Jenkins, visit /systemInfo (
System Properties) and look forjava.version. - Use the value to determine the proper OpenJDK version you need to download and install in your VM Template. For example if the
java.versionis set to1.8.0_242, you can download and install the AdoptOpenJDK jdk8u242-b08.pkg.
- Within Jenkins, visit /systemInfo (
You can run any version of JAVA you want as long as the version inside of the VM matches your Jenkins server
- In the VM, make sure remote login is enabled (
System Preferences > Sharing). - On the host, enable port forwarding for your VM Template using the Anka CLI. We recommend not specifying –host-port.
sudo anka suspend <VM Template name>sudo anka registry push <VM Template name> <Tag name>
Install and Configure the Anka Plugin in Jenkins
These steps are based on Jenkins 2.222.1. Your version and UI may differ slightly.
Navigate to
Manage Jenkins > Manage Pluginsand click on the Available tab. Search in Filter for “Anka”, then install it. You won't see any results if it's already installed.Now you can configure the Anka Cloud. Navigate to
Manage Jenkins > Manage Nodes and Cloudsand find the section calledConfigure Clouds(on older versions you can find this underConfigure System). Inside ofConfigure Clouds, click on Add a new Cloud at the bottom of the page and then click on Anka Cloud.You now have an Anka Cloud panel exposed to do your configuration. You can set Anka Build Cloud to be anything you want. However, you'll need to set Build Controller URL with port to the proper URL of your controller, and make sure you include the port:
http://<ip/domain>:80. Once you're done, click Save.
At this point you can either setup Static Labels under Configure Cloud or use Dynamic Labelling in your Jenkinsfile.
- Static Labels are set up through a Slave Template and can then be referenced in your pipeline or job definitions.
- Dynamic Labels are set up inside of the Jenkinsfile inside of a pipeline, stage, or step-level definition.
Creating Static Labels
Return to
Manage Nodes and Clouds > Configure Clouds. You should now see a VM Templates and Slave Templates section. Make sure Show Templates is checked and click on Add. This creates a new Slave Template you can edit.Under the Slave Template, you want to select the proper Template and Tag or leave it to the default value to select the latest Tag in the Registry.
Leave # of Executors to 1.
Enter the VM user's home path in Remote FS Root. If you didn't set up a new user for Jenkins on the VM, you could use the default anka user:
/Users/anka/.Enter a value in Labels that you can then use in your jobs.
Select the SSH or JNLP method for connection between Jenkins and your Anka VMs.
- SSH: You'll need to add the proper user credentials to Jenkins. If you're using the default user on the VM, use the user:
ankaand pass:admin. - JNLP: This method downloads an agent.jar and the slave-agent.jnlp file from the Jenkins URL you've set in your System Configuration into the VM. If the Jenkins URL doesn't resolve inside of the VM (like if it's set to http://localhost), you won't be able to use JNLP. If you're seeing any problems post-creation of the agent inside of Jenkins, check the running VMs
/tmp/log.txtfor errors.
- SSH: You'll need to add the proper user credentials to Jenkins. If you're using the default user on the VM, use the user:
Enter a value for Slave name template. Provisioned VMs names will contain this value.
You can also pass Environment Variables into the VM.
Select a Node Group if you want VMs provisioned on a specific group defined in your Anka Build Cloud. Available only in Enterprise and Enterprise Plus Tiers.
Enter Priority for VM provisioning. Available only in Enterprise and Enterprise Plus Tiers.
Save the settings.
You can create multiple Slave Template profiles!
Using Dynamic Labelling
Dynamic Labelling requires two plugins: GitHub Authentication plugin and Pipeline.
This section describes the steps to create dynamic labels inside of your Jenkinsfile using the createDynamicAnkaNode function.
- The
createDynamicAnkaNodefunction starts a VM and returns a unique label for it. - The returned label can be interpolated in your pipeline, stage, or step-level definitions. (Example)
createDynamicAnkaNodehas all the configuration options that the UI configured Static Slave Template has.- This allows you to have only a minimal Anka Cloud configuration and define Anka Nodes on the fly.
Jenkins has a Pipeline Snippet Generator, which helps you craft your
createDynamicAnkaNodedefinition. You can find it in your Jenkins instance at/pipeline-syntax.
CreateDynamicAnkaNode Parameters
You can obtain the “masterVmId” (VM UUID) using:
sudo anka show <Template name> uuid
| Name | Type | Default Value | Description | Required |
|---|---|---|---|---|
| masterVmId | String | - | UUID of the VM Template | Yes |
| tag | String | - | VM Template Tag name | - |
| remoteFS | String | Users/anka | Remote node workspace | - |
| launchMethod | String | jnlp | Node launch method: ‘ssh’ or ‘jnlp’ | - |
| credentialsId | String | - | Jenkins credential ID for ssh launch method | - |
| extraArgs | String | - | String to be appended to JNLP command | - |
| javaArgs | String | - | String to append to JNLP java args | - |
| jnlpJenkinsOverrideUrl | String | - | Override the Jenkins server url set in the Jenkins configuration | - |
| jnlpTunnel | String | - | JNLP tunnel to use for node launcher | - |
| keepAliveOnError | boolean | false | Keep the VM instance alive after a failed build | - |
| timeout | int | 1200 | Timeout for starting the instance (in seconds) | - |
| environments | List of tuples | - | List of environment variables to add for the build: [[name: 'FOO', value: 'BAR'], [name: 'OR', value: 'IS']] | - |
| nameTemplate | string | - | Label to use in VM instance names (There are several variables available for interpolation: $Template_name, $Template_id, or $ts) | - |
| priority | int | - | Override the default priority (lower is more urgent) | - |
| saveImage | boolean | false | Save the VM as a Tag before terminating it | - |
| suspend | boolean | false | When saving the Tag, suspend the VM before the push | - |
| TemplateId | string | - | When saving the Tag, push onto a specific Template UUID | - |
| pushTag | string | - | When saving the Tag, set the Tag name (A timestamp will be appended) | - |
| deleteLatest | boolean | false | When saving the Tag, delete the latest Tag for the Template out of the registry before pushing (Dangerous: only use if the Template isn't holding other project tags) | - |
| TemplateDescription | string | - | When saving the Tag, set a description for the new Tag | - |
| group | string | - | Group ID to start the instance in (Available only in Enterprise and Enterprise Plus Tiers) | - |
| numberOfExecutors | int | 1 | Number of Jenkins executors to run on the Node (we recommend 1) | - |
| description | string | - | On creation of the instance, set the description | - |
| labelString | string | - | Override the returned label (not recommended) | - |
Dynamic Jenkinsfile Example
def NODE_LABEL = createDynamicAnkaNode(
  masterVmId: 'e1173284-39df-458c-b161-a54123409280'
)
pipeline {
  agent {
    label "${NODE_LABEL}"
  }
  stages {
    stage("hello") {
      steps {
        sh "echo hello"
      }
    }
  }
}
- In this example, the pipeline uses the “NODE_LABEL” variable defined at the beginning of the file.
- The function call starts an instance with the Template UUID ‘e1173284-39df-458c-b161-a54123409280’ and returns a unique label, preventing any other external step or pipeline from using it. Any unspecified parameters have their default values, as indicated in the parameter list above.
- The sh step waits until the instance is up and the node is connected to Jenkins before it runs.
Other examples:
Using the Cache Builder (Optional)
Cache Tag building is useful when you need to automate the preparation of a VM with dependencies. You can then execute your jobs using this Tag/VM and avoid having to prepare the dependencies over and over again before the build, or test commands run, usually resulting in significant bandwidth and time savings.
The plugin will push to the Registry for any buildStatus except for FAILURE, ABORTED, or UNSTABLE. You can wrap your step-level commands in
catchError(buildResult: 'FAILURE', stageResult: 'FAILURE')or use the Build Execute shell advanced Exit code to set build unstable setting to prevent the VM from pushing.
Configuring Caching for Static Slave Templating
You can find the Cache Builder in the Anka Cloud Slave Template definition under Manage Jenkins > Manage Nodes and Clouds > Configure Clouds.
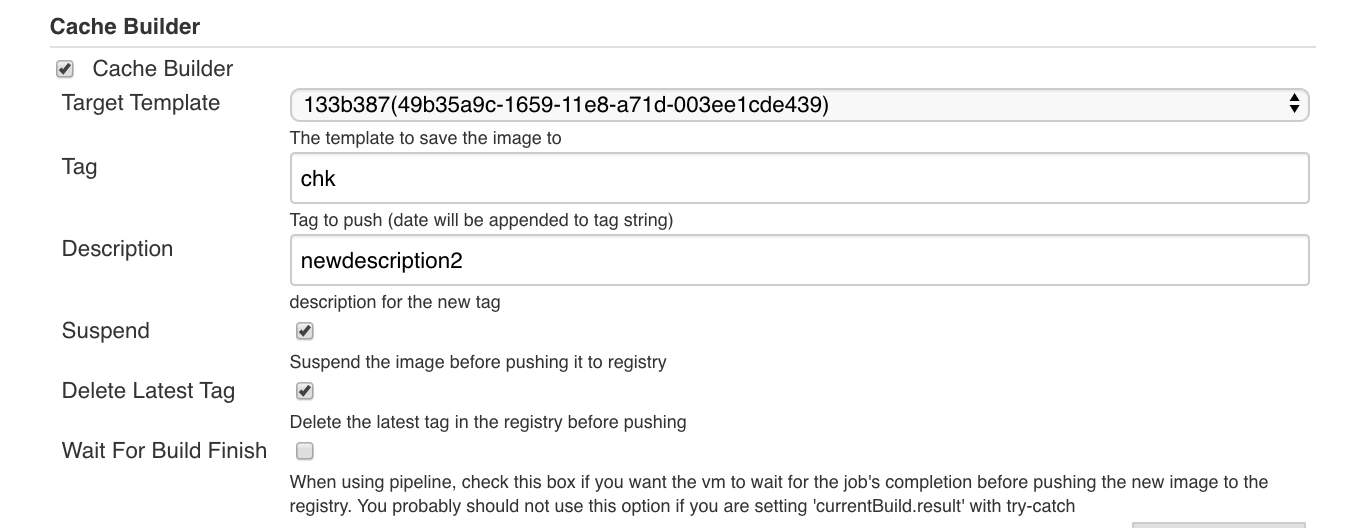
Target Template : A dropdown list of Templates and UUIDs.
Tag : Specify a name for the Tag here. However, the current date is appended onto the end: If I use project1 in this field, I'll end up with a Tag named project1_20200408121026 in my Registry. (Optional; If left empty, it uses the Jenkins jobname)
Description : Description for the VM being pushed (Optional).
Suspend : If selected, it will suspend the VM before pushing the Tag. Otherwise, it will stop the VM before pushing.
Delete Latest Tag : Deletes the latest Tag from the Template/Registry before pushing the newly generated Tag. This is useful to optimize disk space usage.
WARNING: This can delete Tags unrelated to your cache builder configuration.
Wait For Build Finish : This causes the plugin to wait until the entire to job finish before pushing the new Tag to the Registry.
WARNING: Using the
Wait for Build Finishoption in combination with ankaGetSaveImageResult results in a deadlock.
Using the Post Build Step with Static Slave Templates
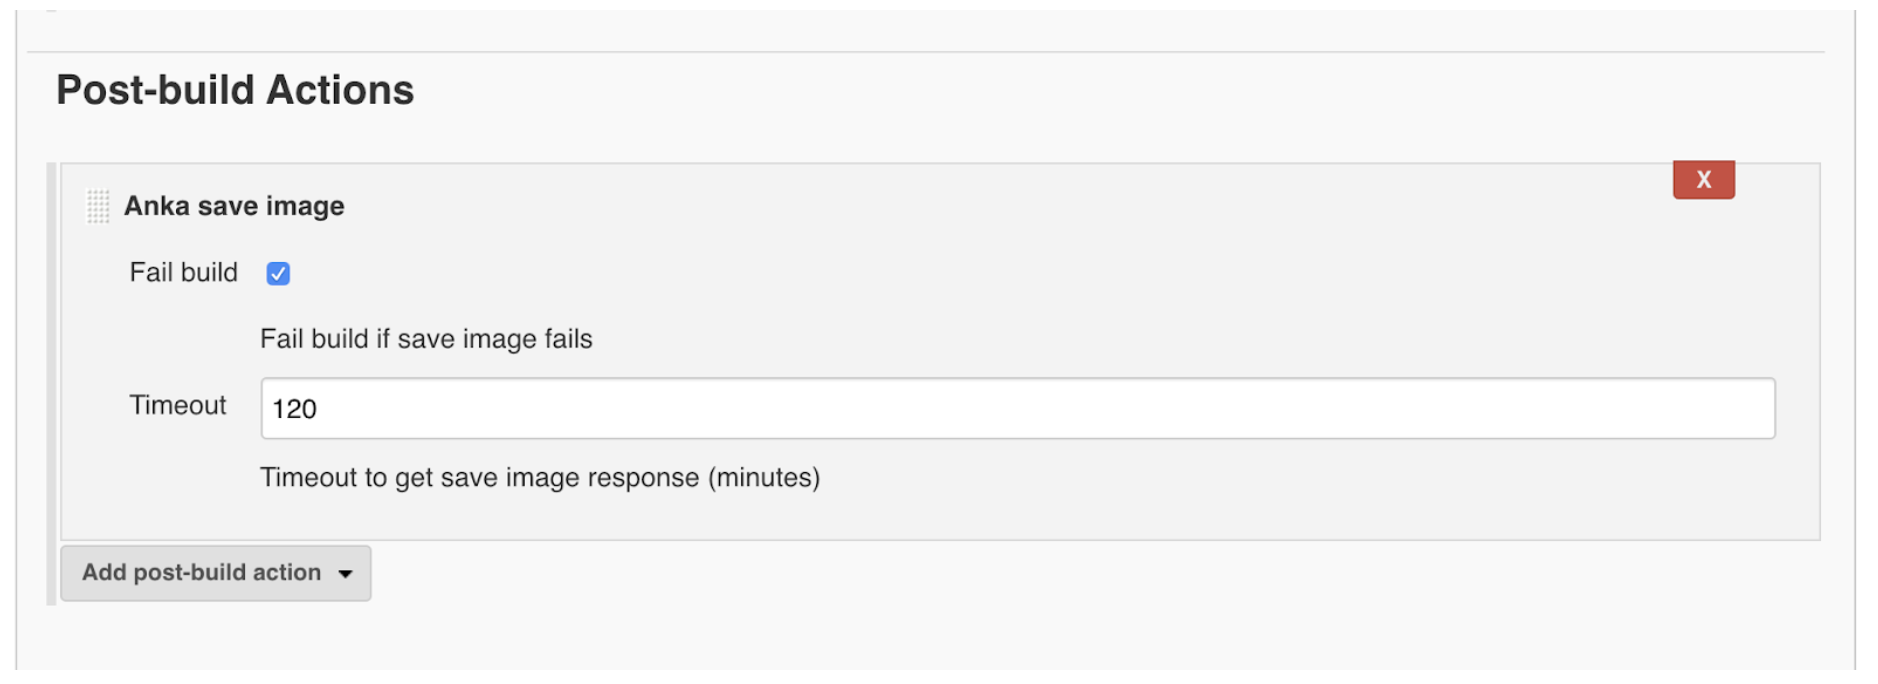
Fail build : Will set the build as failed if the image save request failed (or timed out). If this is not selected, the Post Build Step does nothing.
Timeout : Sets the minutes to wait for the Tag push to Registry to complete (this needs to be determined manually or with trial and error).
Using a Jenkinsfile with the Static Slave Template
Pipelines can have multiple agents running in one build (also in parallel). Therefore, the plugin relies on the buildResult to tell if it needs to execute the “save image request”. You have two options to prevent pushing the new Tag prematurely:
- Wrap your step-level commands in a catchError (from our Nested Cache Builder Example):
stage("run-on-NESTED_LABEL-vm") { agent { label "${NESTED_LABEL}" } steps { // If buildResults == 'FAILURE', Anka will not push the NESTED_LABEL VM. Example: catchError(buildResult: 'FAILURE', stageResult: 'FAILURE') { sh 'uname -r;' } } } - Enable Wait For Build Finish
Configuring Caching with Dynamic Labelling
Please review our Nested Cache Builder Example.
- The AGENT_LABEL VM instance is created to handle the first stage.
- The second stage creates a second VM instance that is configured to push to the Registry once the buildResult is a successful status.
If buildResult receives any of the failed statuses (FAILURE, ABORTED, or UNSTABLE), the ankaGetSaveImageResult outputs
Checking save image status… Done!in the Jenkins job logs/console since there is no push operation to wait on.
Using the Post Build Step with Dynamic Labelling
Create an ankaGetSaveImageResult Pipeline step:
stage("check-generated-tag-from-nested-vm") {
  steps {
    script {
      def getPushResult = ankaGetSaveImageResult( shouldFail: true, timeoutMinutes: 120 )
      echo "ankaGetSaveImageResult Returned: $getPushResult"
    }
  }
}
If you're creating multiple cache Tags in a single pipeline, The ankaGetSaveImageResult function returns true if all previous image save calls for this particular build have executed.
| Name | Type | Default Value | Decription | Required |
|---|---|---|---|---|
| shouldFail | boolean | true | Fails the job if one of the image save requests has failed or timed out | |
| timeoutMinutes | int | 120 | Stops waiting for the result of the Tag -> Registry push after x minutes. |
Remember,
ankaGetSaveImageResultreturns true immediately if nothing pushes to the Registry in a failed build.
Notes on using the Cache Builder
- How often should I cache? : The answer depends on the VM size after you prepare it and also the density of your builds.
- The cache build should have a job or pipeline of its own. Caching after every “regular” build might not make sense as the time that it takes to download code or artifacts is usually the same or shorter than the time it takes to push the Tag to the Registry.
- You should run your cache build once and check how much time the operation takes. The push can be a few gigabytes and might take some time on slower networks.
- Only one Tag can push at a time. You can execute multiple cache builds for the same Template, but those requests end up executing serially.
- If your build/preparation is fast, you can consider running cache builds a few times a day or even based on commits.
- If your cache build is slow, consider running one cache build per day (you can schedule it for a time that Jenkins is not busy).
Feedback
Was this page helpful?
Glad to hear it! Please tell us how we can improve.
Sorry to hear that. Please tell us how we can improve.